Spring Boot File Upload Write to File
- Details
- Written past
- Last Updated on 20 September 2020 | Print Email
Through this tutorial, I will guide y'all how to lawmaking file upload functionality in a Java spider web application based on Jump Kick, Jump Data JPA and Thymeleaf.
Prerequisite: Y'all got familiar with Bound Kicking class handling and Spring Data JPA.
Suppose that we have an existing Spring Kick projection that includes the user management module. Now nosotros want to update the code to let the admin to upload photos for users. The create user form would wait like this:
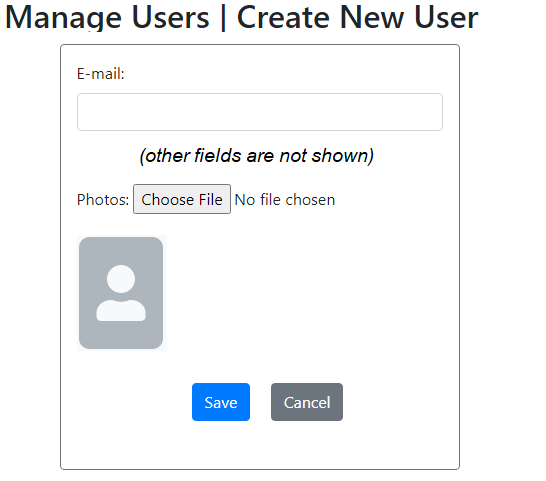
This form, likewise text fields, allows the user to pick a file (contour photos) from local computer and when he clicks Salve, the file will be uploaded to the server and stored in a separate directory. The name of the file is stored in the database. And you will as well learn how to display the uploaded image file in the browser.
i. Update Database table and for Entity class
We need to update the users table in the database, calculation a new column that stores the file name. Say, the column name is photos :
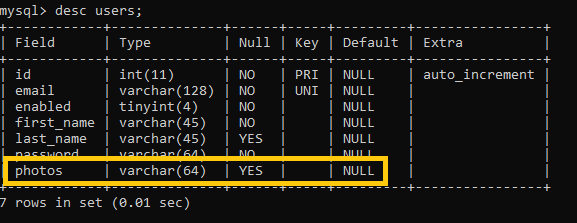
The information type is varchar(64) so the column can shop file proper noun containing up to 64 characters. And then we need to update corresponding entity class User every bit follows:
@Entity @Table(name = "users") public class User { @Column(nullable = true, length = 64) private String photos; // other fields and getters, setters are non shown } And no updates required for the UserRepository form.
2. Update Web Form for File Upload
Next, we need to update the create new user class to add a file input equally follows:
<form th:action="@{/users/relieve}" thursday:object="${user}" method="post" enctype="multipart/class-data" > ... <div> <label>Photos: </label> <input blazon="file" proper noun="epitome" accept="image/png, epitome/jpeg" /> </div> ... </grade> Note that we must set the aspect enctype="multipart/form-information" course the course tag, to tell the browser that this class may contain file upload. And we restrict that only prototype files tin can be uploaded using the accept aspect:
<input type="file" name="image" accept="epitome/png, epitome/jpeg" />
In case you want to permit uploading any files, exercise not apply this attribute.
3. Update Jump Controller to Handle File Upload
On the server side with Bound Kick, we need to update the handler method that is responsible to handle form submission as follows:
@Controller public grade UserController { @Autowired individual UserRepository repo; @PostMapping("/users/save") public RedirectView saveUser(User user, @RequestParam("image") MultipartFile multipartFile) throws IOException { String fileName = StringUtils.cleanPath(multipartFile.getOriginalFilename()); user.setPhotos(fileName); User savedUser = repo.save(user); Cord uploadDir = "user-photos/" + savedUser.getId(); FileUploadUtil.saveFile(uploadDir, fileName, multipartFile); return new RedirectView("/users", true); } } To handle file uploaded from the client, we need to declare this parameter for the handler method:
@RequestParam("image") MultipartFile multipartFile The @RequestParam annotation and MultipartFile interface come from the post-obit packages:
import org.springframework.web.bind.note.RequestParam; import org.springframework.web.multipart.MultipartFile;
That means nosotros don't have to utilize whatsoever external library for treatment file upload. Just apply the spring starter spider web dependency is plenty. Under the hood, Spring will apply Apache Commons File Upload that parses multipart asking to reads data from the file uploaded.
Side by side, nosotros get the name of the uploaded file, ready it to the photos field of the User object, which is and so persisted to the database:
Cord fileName = StringUtils.cleanPath(multipartFile.getOriginalFilename()); user.setPhotos(fileName); User savedUser = service.save(user);
The grade StringUtils come from the packet org.springframework.util. Note that we shop only the file proper name in the database table, and the actual uploaded file is stored in the file arrangement:
String uploadDir = "user-photos/" + savedUser.getId(); FileUploadUtil.saveFile(uploadDir, fileName, multipartFile);
Here, the uploaded file is stored in the directory user-photos/userID, which is relative to the application's directory. And below is the code of the FileUploadUtil class:
package net.codejava; import coffee.io.*; import java.nio.file.*; import org.springframework.web.multipart.MultipartFile; public class FileUploadUtil { public static void saveFile(String uploadDir, String fileName, MultipartFile multipartFile) throws IOException { Path uploadPath = Paths.go(uploadDir); if (!Files.exists(uploadPath)) { Files.createDirectories(uploadPath); } try (InputStream inputStream = multipartFile.getInputStream()) { Path filePath = uploadPath.resolve(fileName); Files.copy(inputStream, filePath, StandardCopyOption.REPLACE_EXISTING); } catch (IOException ioe) { throw new IOException("Could not save image file: " + fileName, ioe); } } } As you tin can see, this utility form is just responsible for creating the directory if not exists, and save the uploaded file from MultipartFile object to a file in the file system.
4. Display uploaded images in browser
In example of uploaded files are images, we tin brandish the images in browser with a little configuration. We demand to betrayal the directory containing the uploaded files so the clients (spider web browsers) tin can access. Create a configuration file with the following code:
parcel internet.codejava; import coffee.nio.file.Path; import java.nio.file.Paths; import org.springframework.context.annotation.Configuration; import org.springframework.web.servlet.config.annotation.ResourceHandlerRegistry; import org.springframework.spider web.servlet.config.annotation.WebMvcConfigurer; @Configuration public class MvcConfig implements WebMvcConfigurer { @Override public void addResourceHandlers(ResourceHandlerRegistry registry) { exposeDirectory("user-photos", registry); } private void exposeDirectory(Cord dirName, ResourceHandlerRegistry registry) { Path uploadDir = Paths.become(dirName); String uploadPath = uploadDir.toFile().getAbsolutePath(); if (dirName.startsWith("../")) dirName = dirName.supercede("../", ""); registry.addResourceHandler("/" + dirName + "/**").addResourceLocations("file:/"+ uploadPath + "/"); } } Here, we configure Jump MVC to allow access to the directory user-photos in the file organization, with mapping to the awarding's context path as /user-photos.
Add together a new getter in the entity class User as follows:
@Entity public class User { @Transient public String getPhotosImagePath() { if (photos == null || id == cypher) render zip; return "/user-photos/" + id + "/" + photos; } } So in the view (HTML with Thymeleaf), we tin can brandish an image like this:
<img th:src="/@{${user.photosImagePath}}" />That's how to implement file upload functionality for an existing Bound Boot application. And in case of images, you learned how to display the images in the browser. To summarize, hither are the key points:
- Add together a column to store file proper noun in the database table.
- Declare a field in the entity class to store name of the uploaded file.
- Use file input in the web form and set attribute enctype="multipart/form-data" for the form tag.
- Use @RequestParam and MultipartFile in Bound controller's handler method.
- Apply Files.copy() method to copy the uploaded file from temporary location to a fixed directory in the file system.
- Configure Spring MVC to expose the upload directory and so epitome files can prove up in the browser.
If yous want to see the coding in activity, I recommend you lot to watch the video below:
Related Tutorials:
- Spring Boot Upload Multiple Files Example
Other Leap Kick Tutorials:
- Spring Boot Export Data to CSV Example
- Spring Boot How-do-you-do World Example
- Spring Kick automatic restart using Spring Kicking DevTools
- Spring Boot Course Handling Tutorial with Spring Grade Tags and JSP
- How to create a Bound Boot Web Application (Jump MVC with JSP/ThymeLeaf)
- Spring Kicking - Bound Data JPA - MySQL Example
- Spring Boot Hello World RESTful Web Services Tutorial
- How to use JDBC with Spring Boot
- Bound Boot CRUD Web Application with JDBC - Thymeleaf - Oracle
- Bound Boot RESTful Grime API Examples with MySQL database
- How to package Spring Kicking application to JAR and WAR
- Spring Boot Security Authentication with JPA, Hibernate and MySQL
- Bound Data JPA Paging and Sorting Examples
- Spring Kick Error Treatment Guide
Almost the Author:
 Nam Ha Minh is certified Java developer (SCJP and SCWCD). He started programming with Java in the time of Coffee 1.4 and has been falling in love with Java since and so. Make friend with him on Facebook and watch his Java videos you YouTube.
Add comment
phillipsmosooving.blogspot.com
Source: https://www.codejava.net/frameworks/spring-boot/spring-boot-file-upload-tutorial
0 Response to "Spring Boot File Upload Write to File"
Post a Comment